Thursday, September 15, 2011

Vegetarian Convenience Meals II - Attack of the Tacos

I like easy food, like tacos. Not hard to make, easy to eat, and requires minimal silverwear to be packed. This week I'm sharing two new awesome vegetarian taco fillings that I've stumbled upon. I've tried these both on just plain tortillas, homemade tortillas, and plain tortillas slightly grilled to give them crunch. All are great and have different levels of work, as you need to allot your time.

The first is the easiest. I'm not typically a fan of red bell pepper and raw onion, but this was so good I didn't even notice it. The flavor is zippy and delicious.
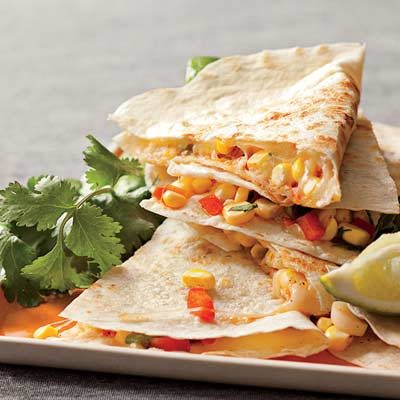

Image from Rachel Ray Magazine Online

Corn Relish Tacos - Modifed from Everyday with Rachel Ray
1 can whole corn kernels, or two cups fresh corn kernels.
1/2 onion, diced fine.
1/4 red bell pepper, diced fine (more if you actually like the flavor)
1/2tsp oregano
Salt and pepper to taste.
Shredded cheese
Tortillas

Combine all ingredients and let sit overnight. Scoop filling onto tortillas and sprinkle lightly with cheese. So delicious, warmed or cold.

Next up is a delicious experiment of my own. I was given a container of storebought coleslaw after a picnic in exchange for some of my zuchinni bread. I decided to use it to make a riff on my old favorite fish tacos from Rubio's, which feature cabbage prominently.
Bean and Coleslaw Tacos
1 can black beans, rinsed
1 clove garlic, chopped fine, or garlic powder
1/4 onion, chopped.
Spices, to taste. I used oregano, salt, and pepper.
1 container premade coleslaw, or homemade if that's what you have.
Shredded cheese
Tortillas

Cook onion in water until translucent or carmelized, whatever you like better. Add garlic and beans, stirring until heated through. Mash some of the beans with the back of your spoon if you want a creamier texture. Add spices and cook until the mixture bubbles.

Place bean mixture on tortillas and add coleslaw and cheese. You can also toss in salsa if you want more zing. However, by itself you have a creamy, satisfying filling that leaves you stuffed and satisfied after two. I tried to get a picture of these, but I ate them all before I though to get my camera. I'll make them again and try for more.

Happy vegetarian lunches!

Thursday, September 8, 2011

See Jane Bike to Work


I've finally got my dream commute. I now live two miles from my school/work, instead of thirty!

Since gas is expensive and time to exercise has been getting scarse, I've taken my repaired bike and put it to good use. Before heading out, I asked around for some advice. Redditor wirehead has been biking for a long time in both urban and rural environments, and had some great advice for me, the novice biker:

Image from Treehugger

First off, he believes that people are more capable of biking than they think. 60% of trips are within five miles, and the average, out-of-shape person can handle that without too much hassle. I'd be concerned about hills if I'm still building muscle, but over flat ground, small errands won't be an issue. Panniers are helpful for doing real errands. I'm not using this idea yet as I'm still conquering the hill outside my apartment, but it's something to think about. People don't realize that the risks of cycling are not as bad as you'd expect. I've noticed that, while I have to pay attention still, people are fairly courteous if you drive close to the edge of the road, obey traffic signs, and use your hand signals. But no one is happy if you ride on the sidewalk and speed through stop signs. Just don't.

When factoring in the time difference between cars and bikes, he reminds new bikers to figure in parking. It's quite easy to park a bike, but hunting for car parking takes longer and often involves walking to your destination afterwards. I can park my bike in front of every building I need, which is awesome on a college campus where most parking is a shuttle ride away. Use Google Maps' biking directions to see if there are shortcuts for bikers, and don't forget that using a bus can be a good way to get around tough spots.

Thursday, September 1, 2011

Arts and Crafts - An upcycled white board

I've been in a crafty mood, so after seeing an article on 35 DIY projects from iVillage, I had to try one out. I settled on PapernStitch's Double-Duty Dry Erase Board. I've been wanting a dry-erase board for my apartment, but I have been hesitating purchasing one. When I saw this, a light bulb went off.

I had friends who bought mirrored closet doors in high school, just to use them as gigantic message boards. I already had a frame, and having a fabriholic mother, I had plenty of fabric scraps from which to choose. I went to work!

While I followed PapernStitch's tutorial for the most part, instead of using tape, I stitched in a large zig-zag across the back with thread. This is usually how you secure fabric over a board, so I just improvised it. Then I stitched down the corners with a whip stitch to stop them from poking up.

Viola! Awesome, pretty much free, and completely upcycled white board. It's also pretty cute when I hang it on the wall.

I've used one as a way to break up my shopping list. What I need from each store goes under the heading, thus making it quite easy for me to find out what I can grab while I'm in the area. I can write reminders on it so I do not walk out of the house without something important (like my lunch; scarf; or head, should I forget to attach it in the morning). It's also keeping me abreast of important events and recording some long-term to-dos, like finally photographing my apartment for family. The best part is, it adds some color and decor to my otherwise-bland kitchen. Huzzah!

Got an upcycling DIY? Let me know in the comments.

Thursday, August 25, 2011

Hypermiling

A question, my readers: I've moved states and am not sure what to do about the "What's In Season" articles.  Would you prefer it moved with me, or should I finish the year in Southern California style? Let me know your thoughts via comment.

On my way out to Missouri, I decided to give as much hypermiling as I could a try. Hypermiling entails making small modifications to your driving habits in order to gain the maximum fuel efficiency from a car as possible. Good.is has a great article on the subject for around-town driving, but for distance, this is what I did.

Image from Geek.com
First, I checked my tire pressure and made sure my tires were properly inflated. It's a small thing, but it can make a huge impact on your mileage. I also checked my fluids and oil levels, since this was a significant trip. I've noticed that when my oil gets low, my gas mileage can drop as much as four miles a gallon.

When I drove, I used a lot of the freeway tips. I was in a car caravan with someone pulling a trailer, so we were driving below my usual rate. I'd guess I was going about 60mph, but according to the other car we were going around 55mph. I was on rural freeways, so I didn't end up using my brakes that much, and it was fairly flat so there wasn't a lot of loading.

I was shocked when I consistently got 43-46mpg out of my little, ancient car. That was an increase of ten to thirteen miles over my previous driving! But for comparison, I had one day when I scored only 36mpg. On that day, I'd been going closer to 65 or 70mpg. So even when driving at a consistent speed, the overall speed matters quite a lot.

I'm finally in a town that requires less driving (huzzah!). Now I'm turning into a cyclist and bus-taker, at least as long as the weather is nice. More on this as I start finding my way around on two wheels instead of four.

Thursday, August 18, 2011

Vegetarian Convenience Meals I

With school starting up again, I'm practicing cooking for an entire week in a single day. I'm rather tired of pasta, so I went exploring for new vegetarian web sites. So here's two new recipes and my commentary with them!

First up: Enchilada Rolls from The Vegan Stoner (A modified version)
Serves 3-4

Extremely delicious and bordering on junk food. Every once in a while, I want something that's not perfectly healthy. This definitely covers it, and is extremely tasty to boot. You may remember my dislike of buying fake meat. These enchilada rolls call for chick'n, so I substituted black beans.

1 can crescent rolls
3/4-1c canned black beans
1c cheddar cheese, shredded, crumbled, or cut into matchsticks (however you have it)
Salsa

Unroll and separate crescent rolls into triangles. Wash the black beans and shake them off to dry. If you leave the canned juice on, it's harder to prepare the rolls.

Press a layer of black beans into each triangle of dough. Sprinkle cheese on top. Roll them as the package directs, and bake at 350 for about ten minutes, or until golden and yummy. Serve with salsa on top.

Quick to make, yummy to eat, and the rolls can be easily refrigerated and reheated later. I wouldn't eat them every day because of the crescent rolls, but these would make a nice picnic meal.

Thursday, August 11, 2011

Six Items or Less - the Midwest Migration

What's green, blogs, and just moved to the Midwest? You guessed it, an Average Jane!

Yep, as I've hinted before, I'm moving from the sunny West Coast to the Midwest in search of more education and lots of new experiences. Like snow. And tornadoes. And this weird thing called "seasonality"..

However, to get to these new experiences, I first needed to drive there. Yes, drive. It's the fastest way to get both me, my car, and all my sturdy furniture to the Midwest. Although my carbon footprint is cringing, I have some great data on hypermiling and the affect it had on my gas mileage.

Moving itself was quite therapeutic for me. I got rid of a lot of things taking up space in my closet, sorted strongly as far as "do I need this or not?", and put the rest in boxes. Anything I was on the fence about was given to people willing to store it for me for a while. My books, however few are coming with me to start, were NOT among these. I have given them to family to keep for as long as they can, and once I'm more established I'll be taking more of these back with me.

However, since I want to pack in boxes as much as I can, I thought that this trip would be a lovely time to try a challenge which has been on my mind. It's called Six Items or Less, and the point is to teach us to make the most out of a wardrobe by wearing six items or fewer of clothing for a month. As the humidity where I'm going is in the 80%+ range and I have no air conditioner in my car, I'm starting with a week as to not gross out my driving buddy. I'll keep my mind open to a longer challenge later.

My six items:

Yellow sundress with belt
White blouse
Blue jean jumper
Pink patterned blouse
Jean skort
Blue shirt

The challenge itself wasn't a problem. You'd be surprised how easy it was to cobble together ten days (I went a bit further than I'd planned) of outfits out of just these items. I think I only repeated a combination once. There was only one problem, and that was laundry.

I couldn't find a way to wash these six and get a full load of laundry. That's frustrating as I would be wasting water and I had to do laundry at least once. These clothes got stained quickly, and after there's a huge spot on the front of a shirt, you either have to hide it with the jumper or wear something else. My new apartment also has expensive laundry, so there's water and economic waste to doing a six-item challenge for a month.

My suggestion is to modify this challenge one way. Forget counting the items and make one load of laundry your goal. That way, you get more items but have less waste.

Comments? Tried a six-item challenge? Let me know. 

Thursday, July 21, 2011

Reduce, Reuse!

Last week was recycle, and by sheer chance this week is reduce and reuse.

I have a lovely pair of boots, super warm and waterproof. I'll be needing them a lot this winter as I face SNOW for the first winter ever. The zippers have always been choosy, and when I was sewing the teeth of the zipper down, I managed to snap the zipper pull in half along the body. BAM! Expensive pair of boots now non-functional.

I'm moving to a town where biking is more feasible than driving a car. I definitely need a bike, but how to get one on a student's budget?

This, my darling readers, is where the other two, oft-neglected R's come into play. We're all good about recycling, but many of us (including me) forget to reduce our waste and reuse what we can.

I took my boots to a cobbler. It sounds old-fashioned, but for $12 I was able to get the boot back into perfect working order. $12 sounds like a lot for a zipper pull, but compared to $80 for new boots it's a steal. Reduced my need for new items? Check.

In hunting through the remnants of my grandmother's garage contents, I found a lovely bike. Problem: the bike is probably twice my age, has a chain that's rusted solid, and the back brakes aren't terribly responsive. A reuse is in the works. I don't know much about bikes, so I took it to pros and had them tune it. Not only were they absolutely entranced by a bike with little levers for shifters, they brought it up to working order. Also steep price for a student like me: $110 after labor. It's still cheaper than a few hundred for a new bike, though. Now that I have a clue what's going on and know the bike isn't going to fall apart, I can do my own maintenance. I wanted to have it professionally checked the first time, though, to make sure there wasn't any major issue that could be dangerous. What I did find out - it's a steel frame bike and apparently pretty darn tough, better than what I could buy in a store. That's a definite plus!

There you have it: for around a fifth of the price of replacing, I reduced waste and reused what I found. If you haven't ever tried a classic repair place, give it a shot. It'll be cheaper than buying new, and the planet will definitely thank you for the effort.

Oh, and you won't mind a proud newbie gardnerer bragging a bit, right?