Showing posts with label crafts. Show all posts

Thursday, September 1, 2011

Arts and Crafts - An upcycled white board

I've been in a crafty mood, so after seeing an article on 35 DIY projects from iVillage, I had to try one out. I settled on PapernStitch's Double-Duty Dry Erase Board. I've been wanting a dry-erase board for my apartment, but I have been hesitating purchasing one. When I saw this, a light bulb went off.

I had friends who bought mirrored closet doors in high school, just to use them as gigantic message boards. I already had a frame, and having a fabriholic mother, I had plenty of fabric scraps from which to choose. I went to work!

While I followed PapernStitch's tutorial for the most part, instead of using tape, I stitched in a large zig-zag across the back with thread. This is usually how you secure fabric over a board, so I just improvised it. Then I stitched down the corners with a whip stitch to stop them from poking up.

Viola! Awesome, pretty much free, and completely upcycled white board. It's also pretty cute when I hang it on the wall.

I've used one as a way to break up my shopping list. What I need from each store goes under the heading, thus making it quite easy for me to find out what I can grab while I'm in the area. I can write reminders on it so I do not walk out of the house without something important (like my lunch; scarf; or head, should I forget to attach it in the morning). It's also keeping me abreast of important events and recording some long-term to-dos, like finally photographing my apartment for family. The best part is, it adds some color and decor to my otherwise-bland kitchen. Huzzah!

Got an upcycling DIY? Let me know in the comments.

Friday, July 1, 2011

Celebrate Independence (And go plastic-bag free)

Happy (early) Independence Day to all my fellow American readers!

Just in time for 4th of July, the Mother Nature Network invites us all to celebrate plastic bag independence on July 3rd. In celebration of this, I'm featuring cool non-plastic bag options.

Hand carry wrap
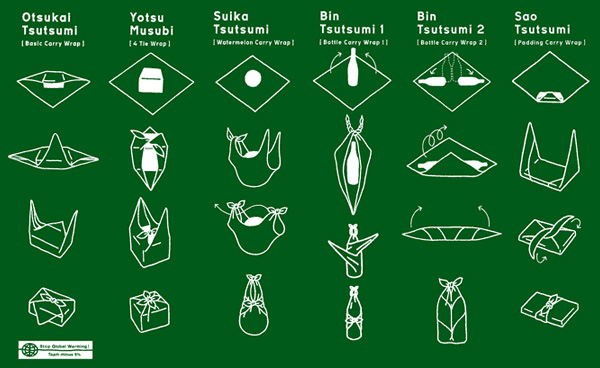
Of course, there's always my favorite furoshikis. I use a hand carry bag wrap for just about everything! It's especially good for groceries since you can hang the two separate handles on the metal hooks for plastic bags and it will keep its shape during loading.

The only thing the hand wrap isn't good with is books. I use the large object wrap with a smaller furoshiki than needed for "large objects" if I have a lot of books, or the two books wrap for some novelty fun.

Large object wrap and a summer read
One thing I've learned over the last few months about furoshiki: try to tie as much as you can in advance. For example, the hand carry wrap can be basically tied in advance, rolled tightly, and popped into your purse or bag. I use an old, stretched out hair tie to keep it together. The large object wrap can have its diagonal corners tied beforehand, or while you're standing in line. When you're ready to pack, slip the books into the loop, then quickly tie the third step and walk out happy.

Do you have no reusable bags, but some unused fabric? My favorite crafting blog, How About Orange, has a list of tote bag tutorials to help you upcycle your fabric into something pretty and useful.

Ever stuck without a laptop bag? Howcast has a way to turn a hoodie into a laptop bag in quite a clever way.

So, my darling readers, are you inspired to shun plastic bags for a day? If you are, leave your favorite "go green" tip in the comments, and one at random will win a furoshiki! It's upcycled (which means my grandmother dumped a lot of her old scarves on me) so I can't comment on the color. It's going to be a patriotic red and blue camouflage! The winner will be announced in two weeks.

Please, US residents only for the competition. Your comment must be posted by Friday, July 8th to be eligible.

Go forth and celebrate! 

Thursday, April 28, 2011

Book Review: Urban Farmer

I've recently read a fantastic book about urban farming by Lorraine Johnson. While I hoped for a how-to book about gardening (and thus avoid further Fred-like disasters), I found instead a manifesto and argument for urban farming which is quite persuasive.

Johnson's argument for urban growing focuses on several points:

  1. That land suitable for agriculture in cities is actually more prevalent than imagined.
     Johnson believes that, should lawns, boulevard strips, vacant lots, and even roofs be farmed, many cities could supply their own produce needs. The author is from Canada, so many of her statistics focus on cities there, but one of the studies she cited calculated that, if half of lawns and vacant lots, as well as one tenth of boulevard easements were cultivated, Montreal could provide more than enough to meet the needs of all its citizens using the most conservative estimate of produce needed for the average 4-person family. This still assumes some imports of things such as bananas, coffee, and other exotic imports, but basic needs can be easily met. The author herself maintains a community garden plot, tomatoes on her roof, and a fully-planted backyard; gleans from "ornamental" hawthorn trees, and farms her back patio. In her youth, she planted container gardens on balconies and radishes in cat-litter trays. She has seen beans planted on fire escapes and lettuce in pipes wrapped around balcony rails. Her point: it's doable to garden, no matter what sort of space you have.
  2. That small-scale plots can be effective in agricultural production, at least on the local level. Her statistic was of a demonstration farm that, in a single year on less than an acre of land, produced $65,000 in produce. During World War II, Victory Gardens and backyard cultivation produced 40% of the vegetables in the USA. It is possible to support much of a populace on urban food, though she admits that some places will find it more economical and environmentally efficient to import, based on local weather and resources.
  3. That the production of food can solve many social ills. Children who grow their own food, or participate in the process, are more likely to eat nutrient-rich vegetables and be less picky of eaters. Homegrown food often tastes better because growers need not worry about equal size and ripening time, hardiness, and ability to ship long distances like industrial complexes. Furthermore, many urban communities live in what has been termed as a "food desert" - where access to fresh produce is limited by few grocery stores or lack of transportation to those which exist. Many people are forced to shop at convenience stores, which are not the healthiest places to eat. Because urban farming is often quite cheap, it would also solve the problem of vegetables being too expensive for poverty-stricken families.
  4. That urban farming can have extended benefits beyond simple food production.
    This is a huge part of her book. Johnson argues that cultivation of land, especially vacant land, will help with community-building. It makes "abandoned" land into something valued and for which the community cares, instead of an eyesore. Urban gardeners have also been shown in studies to participate more actively in their community events, take part in beautification projects and trash clean-ups, and give produce away (beyond the bags upon bags of excess zuchinni!). Gardening helps build stronger communities, something which is often lacking in urban society. 
That's only the tip of the iceberg for Johnson's ideas. She also devotes time to guerrilla gardening and urban chicken-keeping. While a bit beyond the average person's abilities and space, they are none the less interesting ideas. The point of her book is that growing food need not be relegated to rural areas and ignored by city-dwellers. Urban residents often have the tools at hand to grow food, even if it's just herbs on a windowsill, and doing so will have definite benefits. 

I highly urge you to read the whole book - it's quite well-written and addresses more problems and concerns than I have space to go into here. If this doesn't inspire you to go plant something, I don't know what will!

Now all I have to do is figure out how not to kill my plants... :)


Thursday, December 23, 2010

Rainy Weather and Hot Cocoa

Oh, the weather outside is frightful! It's been raining for nearly a week now, and before that, there was a cold snap of down to 45 degrees F, which is EXTREMELY cold for this area. I normally try to stay away from caffeine (ignoring the occasional Dr Pepper indulgence), so when it gets cold, I turn to cocoa.

Cocoa is one of those black box foods, like baking powder, that we use without knowing how it's made. There are cocoa recipes out there, but they involve heating milk and mixing in cocoa and it's messy to do on the run. Mixes are infinitely superior. But as you know, I'm a big fan of making whenever possible because it's often greener than a mass-produced version, it uses less packaging, and you know exactly what goes into it.

Plus, while I've bought a few gifts, I wanted to make something for my friends. So I decided to make cocoa mix and package it in tins as a gift. I turned to my trusty Make-A-Mix cookbook, which has always served me well.

Cocoa Mix Recipe
1 cup powdered milk
1 cup nondairy creamer
3/4 cup cocoa powder.
1 1/2 cup sugar

Mix all. To serve, mix 4 heaping teaspoon fulls in a glass with 8oz boiling water. I added a large handful of mini-marshmallows to my tins of mix, too, because cocoa is never right without mini marshmallows. Pop it in a tin, and it makes a great gift any time of the winter.

Super tip-top holiday secret - a splash of eggnog in your newly-handmade cocoa may just be the best treat ever invented.

Wednesday, December 22, 2010

Not Food: Furoshiki strike again!

It's Christmas, and this year I'm trying to avoid wrapping paper.

When I was growing up, we didn't wrap family gifts in paper. We'd either use paper bags, which were reused, or my mom made a lot of simple fabric bags with Christmas fabrics.

In the spirit of reusable Christmas wrappings, I used Christmas fabrics to wrap my gifts furoshiki-style.

I just took scrap fabric from my mom's copious fabric stash, cut it with pinking shears so the edges wouldn't unravel, and wrapped the gifts. I also included a little card with a link to furoshiki.com so the recipients would know how to reuse them. I tucked it inside all my wrapped gifts.

The box was the easiest thing to wrap. Myfuroshiki has a great tutorial about your standard gift wrap. The hardest one to wrap was the ceramic coffee cup I bought for a friend. I tried to use the One Bottle Wrap 5, but it turned out a little odd. I fluffed two ends, and tucked the other two underneath. It's just hard to wrap something conical.

I think the best part of wrapping with cloth is that it made its own bow!


Tuesday, September 28, 2010

DIY Groceries

If there's one thing that nearly every green guru, food guru, and vegetarian magazine I've read agrees on, it's that we're using too many processed foods in our diet. It's healthier and better for the planet, many say, to make your own food if you have the time and the know-how.

But where can you find that sort of know-how? I know that I'm fairly kitchen-savvy. Thanks to the web, I can google a lot of things if I realize I can make them. But if I don't know that I can make them, I'm kind of stuck.

For example: I was out of baking powder. I've never used much baking powder, nor had I looked at the label and attempted to decipher exactly of what baking powder is composed. I was flipping through the internet, and by random chance, I stumbled onto a recipe for vegan baking powder. To my shock, it wasn't that complex:

1/4 c baking soda.
2 tbsp cream of tartar
2 tbsp cornstarch

That was all that's in my mysterious baking powder can. Really. And when I did some more checking, I found that it also didn't contain aluminum derivatives for preservation, and that this recipe will last a month or so if kept dry.

It gets me thinking. We take so many premade things as black boxes when we really could just make them at home. It eliminates preservatives and many other problems, and lets us use local produce and ingredients that meet our standards. For a great reference, check out the book series "Make Your Own Groceries" by Daphne Metaxas Hartwig. I grew up with these books and they work wonders.

What do you make that most people normally buy? Tell me in the comments.

Thursday, September 2, 2010

Backyard Bucket Garden

I started on my Global Bucket system today! I'm undertaking these as an experiment in urban gardening, though I live in a semi-rural area and could grow in ground if I wanted to. My thought guidelines for this are as follows:

1)Is it small enough that it could work on an apartment patio, assuming enough sun?

2)Is it easy for a busy person (like me!) to maintain during work and school without much bother?

The two buckets together
3)Is it aesthetic enough that apartment neighbors wouldn't complain?

4)Is it easy to make?

For containers, I opted to use plastic cat litter buckets instead of buying new buckets. Because having a patio covered in "Tidy Cat" logos didn't appeal, I used plastic spray paint to cover the logos and make them a pretty color. When using the spray paint, be sure to be about fifteen feet from anything you love the color it is, lay the buckets on copious newspaper, and don't flip them until your finger doesn't leave a print in the paint.
Interior view. 

Home Depot supplied some PVC pipe, and I had leftover red cups from a party. Using a drill, I added drainage holes and holes for the PVC and plastic cup.

All I need to finish it is to decide with what to fill it. Global Buckets says to use moss, vermiculite, and perlite, commonly found in potting soil, and not to use compost because it won't wick water. Now, I want to see if there is a way to wick water along with using potting soil. Compost is not only free because it's made of vegetable scraps and green waste, making the vegetables grown sustain themselves, but they're also better for the soil than chemical fertilizers. This will probably get a blog post of its own, since I could talk about it for a while.


More to come!

Tuesday, August 24, 2010

Global Buckets

I am in serious awe right now. Two brothers, ages 17 and 15, have developed a container growing system that uses minimal water and minimal space to grow container gardens for rooftops. These Global Buckets don't require much tending, and you can even automate the watering system..


I'm highly intrigued. I have a brown thumb to the max (through care and devotion, I killed my potted desk bamboo), and not much time, so their appeal is obvious.

These guys have done a lot of experimentation and are constantly playing with new designs. I'm impressed by the way they have considered a lot of problems and how it's designed to work in non-agricultural land. As more people move to cities and growing land turns to a premium, gardens like this are going to be more and more useful. The inventors pitch it as a solution for feeding the poverty-stricken in third world and urban-yet-poor areas like Calcutta. I pitch it to you as the solution to urban agriculture for anyone.

The only part I dislike about their system is their use of chemical fertilizers. While their system is closed and no fertilizers will hit the local water table, chemical fertilizers can become expensive for people who also find a 5-gallon bucket too valuable to punch holes in. When I make a few of my own, I'm going to experiment to see if I can use compost as fertilizer instead of pellets.

Even with this setback, I love the idea, and I'm going to make a couple for my back patio. After all, the urban gardening culture is growing (no pun intended). Urban beekeeping is coming into vogue, especially in France, where the urban hives are thriving more than the rural ones. Grass roofs and edible lawns are actually becoming known. And if you grow it yourself, there's no transit costs, no pesticides, and it's fresh and full of nutrients.

Check back soon! I will post my results and experiments on this front once I have them running.

Thursday, July 1, 2010

Natural Beauty from the Garden

Phew! I've been reading the Good Guide and it's a bit scary when you start looking at personal hygiene and body care products. The shampoo I'm using has a suspected respiratory irritant in it, most body washes are ranked poorly, and don't get them started on antiperspirants.

The problem with their highly-ranked products is that they begin to get really expensive. I'm a college student; I don't have that kind of money to spend on body soap. I do, however, have a bit of extra time this summer, so I thought I'd take matters into my own hands and try to make my own products.

Janice Cox has a fantastic series of home beauty books with really easy recipes. I own Natural Beauty at Home, but I've read her other books and find them just as good. All the recipes involve things which are easily found in the grocery store or easily grown, if you have gardening space or friends with a green thumb. Even if you have to buy everything, it's not terribly expensive. It's sectioned by type of product, with a special section for men's products.

I've tried several recipes with good success. The sugar scrubs are really easy, and a great way to refresh your skin. Olive oil works wonders as an eye-makeup remover, and also moisturizes the thin eye skin.

One of her recipes I've tried and really like is the All-Purpose Honey Cleanser. It works for face, body, and hair. The honey is great for me, since I have oily, troubled skin and honey is antibacterial (and therefore anti-acne). The recipe is:
2 Tbsp liquid soap (see the note at the end)
1/4 c. honey
1/4 c. rose water, orange flower water, or distilled water (or a mix of any of these.--AJ).

Stir them gently so the soap doesn't foam. Pour into a clean jar or a container with a pump or spout (Recycled hand soap containers work nicely. -AJ) To use, pour a small amount in your palm and massage gently into your skin or hair. Rinse thoroughly and pat dry (p. 34). It thickens to the consistency of standard hand soap over time.

Note: liquid soap can be made by dissolving regular soap in water at a 1:1 ratio (e.g.: 1 Tbsp soap in 1 Tbsp water). I find it helps to grate it first using a normal cheese grater to speed up the process. I made this with a really expensive handmade soap from a Renaissance faire to give it a nice scent, which worked really well.

Saturday, June 5, 2010

The Furoshiki

I hate tote bags. They get in the way, they are never the right size, and they don't usually look all that good, either. I'm sure they have their uses, like when I need to haul heavy or sharp things, or dirty things, but for everyday work I really dislike them. Plus, they're a pain to fold up and bring.

So, I was quite happy to discover the Japanese furoshiki. It's the art of folding basically a large scarf into a multitude of shapes, wraps, and carryalls. It was originally designed to be used in Japanese baths, as a non-cold place to sit on and something to hold your clothes. But lately the Japanese government has rejuvenated it as a greener alternative to plastic bags. Furoshiki.com has expanded upon the idea and created well over 50 techniques which do everything from shirts to pillows to (yes) carryall sacks. There's also the blog MyFuroshiki which posts new designs on occasion.

Both sites also sell them, but I find that cheap synthetic scarves from your local thrift shop do just as well and come in lots of shapes and colors. I use one to carry my lunch bag to school and then remove the bag and retie to to carry my groceries. When it's dirty, throw it in the wash.

One recommendation - use a scarf you don't mind getting ruined. Sharp edges can cut threads and some things can poke holes in the fabric.

This also works nicely as a birthday gift wrap. I gave a friend a vase and wrapped it in a pretty scarf using furoshiki techniques. She got two gifts in one and was thrilled.

Thoughts? Ideas? Got a great wrap? It works wonders.